
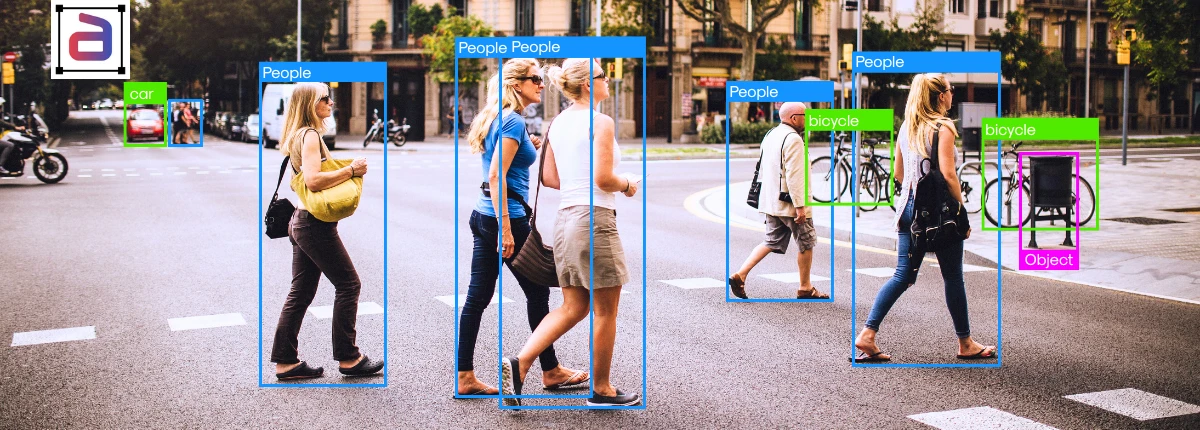
Choosing an image annotation method is not simply a choice between bounding boxes, polygons, segmentation, or keypoints. Each annotation type teaches a computer vision model something different about an image.
A classification label can tell a model what appears in an image. A bounding box adds where the object is. A segmentation mask describes its exact visible region. Keypoints represent important landmarks, while 3D cuboids introduce depth and orientation.
The right choice depends on what the model is expected to predict. Using a more detailed annotation than the task requires can add unnecessary labeling effort. Using one that is too coarse may fail to capture the ground truth the model needs.
This image annotation guide provides a practical framework for selecting the right labeling method based on model objective, geometric detail, output requirements, dataset complexity, and quality needs.
Key Takeaways
- Choose the annotation method from the model output you need, not from the annotation tool you already use.
- Classification works at image level, bounding boxes localize objects, and segmentation represents exact image regions.
- Instance segmentation is useful when individual objects within the same class must remain separate.
- Keypoints and landmarks represent important positions rather than complete object boundaries.
- Polylines suit long, narrow structures such as lanes, cracks, cables, and routes.
- 3D cuboids are appropriate when depth, dimensions, position, or orientation matter to the model.
- More detailed annotation is not automatically better; additional precision should solve a specific modeling requirement.
Table of Contents
- 1. Start With the Model Output, Not the Annotation Type
- 2. Image Annotation Method Selection Matrix
- 3. Choose Image Classification When Location Does Not Matter
- 4. Choose Bounding Boxes for Object Localization
- 5. Choose Polygon Annotation for Irregular Object Boundaries
- 6. Choose Semantic Segmentation for Complete Scene Understanding
- 7. Choose Instance Segmentation When Individual Objects Must Stay Separate
- 8. Choose Keypoints and Landmarks for Pose and Feature Localization
- 9. Choose Polylines for Long and Narrow Structures
- 10. Choose 3D Cuboids When Depth and Orientation Matter
- 11. When Should You Combine Annotation Methods?
- 12. Match Annotation Detail to the Information the Model Needs
- 13. Define the Taxonomy Before Annotation Starts
- 14. Test the Annotation Strategy Before Scaling
- 15. Measure Quality Differently for Each Annotation Type
- 16. Image Annotation Method Selection Checklist
- 17. How Annotera Supports Multi-Method Image Annotation
- 18. Conclusion: Use the Simplest Annotation That Captures the Required Ground Truth
Start With the Model Output, Not the Annotation Type
The most useful question at the beginning of an image annotation project is:
What exactly should the model predict when it receives a new image?
The answer usually points toward the required ground-truth format.
| If the Model Needs to Predict… | Consider… |
|---|---|
| What category the entire image belongs to | Image classification |
| Which objects are present and approximately where | Bounding boxes |
| The detailed outline of selected irregular objects | Polygon annotation |
| The class of every relevant pixel or region | Semantic segmentation |
| Which pixels belong to each individual object | Instance segmentation |
| Specific joints, landmarks, corners, or reference points | Keypoint / landmark annotation |
| The path of a lane, crack, cable, route, or thin feature | Polyline annotation |
| Position, size, depth, and heading in 3D space | 3D cuboid annotation |
This task-first approach helps avoid a common mistake: choosing an annotation method because it appears more precise rather than because the model actually requires that additional information.
Teams that need a broader introduction to the role of labeled visual data can first read The Basics of Image Annotation. This guide focuses specifically on choosing the annotation representation.
Image Annotation Method Selection Matrix
The following matrix provides a practical starting point for comparing common image annotation methods.
| Method | What It Captures | Typical Task | Relative Annotation Detail |
|---|---|---|---|
| Classification | Whole-image category or attributes | Image classification | Low |
| Bounding Box | Approximate object location and extent | Object detection | Low–Medium |
| Polygon | Detailed irregular object outline | Shape-aware detection / masking | Medium–High |
| Semantic Segmentation | Pixel-level class regions | Scene segmentation | High |
| Instance Segmentation | Pixel-level region for each object instance | Object-level segmentation | High |
| Keypoints / Landmarks | Important spatial reference points | Pose and landmark detection | Task dependent |
| Polyline | Ordered path through connected points | Linear feature extraction | Task dependent |
| 3D Cuboid | 3D position, dimensions and orientation | Spatial object detection | High |
Choose Image Classification When Location Does Not Matter
Image classification assigns one or more labels to an entire image.
It works well when the model needs to answer questions such as:
- Does this image contain a defective product?
- Which product category appears in this image?
- Is this scene indoor or outdoor?
- Does this image contain restricted content?
- Which type of plant disease is visible?
Classification does not tell the model where the object appears. If spatial location matters, another annotation method may be required.
Annotera’s image classification annotation services support single-label, multi-label, hierarchical, attribute-based, and domain-specific visual categorization.
Choose Bounding Boxes for Object Localization
Bounding boxes add location information by placing a rectangle around an object.
They are well suited to tasks where the model needs to identify:
- what object is present;
- where the object is located; and
- approximately how much of the image it occupies.
Common examples include vehicles, people, products, equipment, packages, animals, and other discrete objects.
The main limitation is geometric. A rectangular box includes background pixels around irregularly shaped objects.
If that additional background does not harm the downstream task, bounding boxes can provide efficient object-detection ground truth without the added complexity of detailed boundary tracing.
For object-detection projects, Annotera provides 2D bounding box annotation services with custom object classes, occlusion rules, attributes, and QA requirements.
Choose Polygon Annotation for Irregular Object Boundaries
Polygon annotation uses connected vertices to trace an object’s visible contour more closely than a rectangle can.
It becomes useful when background included inside a bounding box would reduce the usefulness of the ground truth.
Examples can include:
- irregular products;
- damaged surfaces;
- construction zones;
- agricultural regions;
- medical structures;
- fashion items; and
- complex industrial components.
The important question is whether the task actually requires contour information. If object localization alone is sufficient, the additional polygon effort may not add useful training signal.
Annotera’s polygon annotation services support detailed contour labeling for irregular visual objects across computer vision applications.
Choose Semantic Segmentation for Complete Scene Understanding
Semantic segmentation assigns a class to pixels or pixel regions across an image.
Instead of saying only “there is a road,” a segmentation dataset can distinguish areas belonging to road, sidewalk, building, vegetation, vehicle, pedestrian, sky, or other project-defined classes.
This makes semantic segmentation useful when the model needs to understand scene composition rather than detect only a few isolated objects.
Potential applications include:
- autonomous navigation;
- aerial and satellite mapping;
- medical imaging;
- agricultural analysis;
- robotics;
- industrial inspection; and
- environmental mapping.
Because segmentation contains considerably more spatial information than a bounding box, it also requires more detailed annotation rules for edges, overlapping regions, small objects, ambiguous pixels, and class precedence.
Learn more about Annotera’s semantic segmentation annotation services.
Choose Instance Segmentation When Individual Objects Must Stay Separate
Semantic segmentation answers which class each pixel belongs to. Instance segmentation goes further by separating individual objects within the same class.
For example, if five people stand next to one another:
- semantic segmentation may identify all person pixels as the same class;
- instance segmentation preserves Person 1, Person 2, Person 3, Person 4, and Person 5 as separate object instances.
This distinction matters for applications that require object counting, manipulation, instance-level measurement, or separation of overlapping objects.
Before choosing instance segmentation, confirm that the model genuinely needs individual identity at the pixel level. If class-level scene understanding is enough, semantic segmentation may provide the required ground truth with a simpler labeling structure.
Choose Keypoints and Landmarks for Pose and Feature Localization
Keypoint and landmark annotations represent important locations rather than complete object boundaries.
Examples include:
- human joints for pose estimation;
- facial landmarks;
- hand and finger joints;
- anatomical reference points;
- corners of structured objects;
- sports equipment landmarks; and
- industrial reference points.
The annotation specification should define each point semantically. For example, a body-pose project needs consistent definitions for left shoulder, right shoulder, elbow, wrist, hip, knee, and other required landmarks.
Visibility and occlusion rules are also essential. Teams must decide whether hidden landmarks should be inferred, marked as occluded, or omitted.
Annotera’s landmark annotation services support facial, body, structural, medical, and other project-specific reference points.
Choose Polylines for Long and Narrow Structures
Some visual features are better represented as paths than regions.
A polyline uses an ordered sequence of points to represent a linear structure. Typical examples include:
- road lanes;
- road boundaries;
- pipelines;
- power lines;
- cables;
- cracks;
- rivers;
- routes; and
- diagram connections.
This avoids using a wide polygon or many small bounding boxes to describe a feature whose primary information is its path or centerline.
Polyline projects still need detailed rules for continuity, gaps, intersections, endpoints, vertex placement, and occlusion.
For those decisions, see our guide to polyline annotation for static images or explore Annotera’s polyline annotation services.
Choose 3D Cuboids When Depth and Orientation Matter
A 2D bounding box provides location in the image plane. A 3D cuboid adds spatial dimensions that can represent an object’s position, size, depth, and orientation.
This is useful for perception tasks involving:
- autonomous vehicles;
- mobile robotics;
- warehouse automation;
- LiDAR perception;
- sensor fusion;
- spatial AI; and
- depth-aware object detection.
3D cuboid annotation requires more specification than simply drawing a box. The coordinate frame, dimension order, depth reference, yaw convention, front-facing direction, occlusion policy, and sensor alignment may all affect the ground truth.
Annotera’s 3D cuboid annotation services support camera, LiDAR, and other depth-aware perception workflows.
For orientation-specific dataset design, see 3D Cuboid Orientation Annotation: Defining Accurate Yaw Ground Truth.
When Should You Combine Annotation Methods?
Some computer vision datasets require more than one annotation representation.
For example:
| Application | Possible Combination |
|---|---|
| Retail shelf analytics | Bounding boxes + product class + attributes |
| Human activity understanding | Person bounding box + skeletal keypoints |
| Autonomous driving | 3D cuboids + semantic segmentation + lane polylines |
| Medical imaging | Classification + segmentation + anatomical landmarks |
| Industrial inspection | Object boxes + defect polygons + defect attributes |
| Aerial infrastructure mapping | Polygons + polylines + object classification |
The important point is that each annotation layer should answer a separate modeling requirement.
Adding multiple label types simply because the annotation tool supports them can increase production effort without improving the usefulness of the dataset.
Match Annotation Detail to the Information the Model Needs
There is a natural temptation to assume that more detailed annotation produces better AI.
That is not always the right optimization.
If a model only needs to detect whether a package is present, pixel-level segmentation may add little value over a bounding box. If a surgical model must distinguish a precise tissue boundary, a coarse rectangle may discard important information.
A practical decision balances four questions:
- Information: What does the model need to predict?
- Precision: How exact must the target geometry be?
- Consistency: Can humans label that information reliably?
- Effort: Does the additional annotation detail justify the production cost and QA burden?
The best annotation design captures enough information to train and evaluate the target behavior without adding detail that the model will not use.
Define the Taxonomy Before Annotation Starts
Selecting the annotation geometry is only half of the problem. Teams must also define what the labels mean.
Consider a retail dataset. Before drawing boxes, the project may need to decide whether similar products are labeled as:
- beverage;
- soft drink;
- cola;
- brand;
- specific SKU; or
- several hierarchical labels at once.
The geometry can be perfect while the dataset remains unsuitable if the class taxonomy does not match the model objective.
Before production, define:
- class names;
- class definitions;
- parent-child relationships;
- required attributes;
- inclusion and exclusion rules;
- handling for unknown classes;
- occlusion rules;
- minimum object requirements; and
- examples of ambiguous cases.
Test the Annotation Strategy Before Scaling
A pilot batch should test the annotation design before the full dataset enters production.
The pilot should contain easy examples as well as difficult ones:
- small objects;
- partial occlusion;
- poor lighting;
- crowded scenes;
- unusual viewpoints;
- rare classes;
- ambiguous boundaries;
- objects at image edges; and
- examples that should not be annotated.
Reviewing disagreement at this stage can reveal whether the annotation method itself is appropriate.
For example, repeated disagreement around object boundaries may indicate that a bounding-box task needs clearer tightness rules—or that the model requirement actually calls for polygons or segmentation.
Measure Quality Differently for Each Annotation Type
One generic “annotation accuracy” score is not equally informative across every labeling method.
| Annotation Method | Useful QA Questions |
|---|---|
| Classification | Was the correct class selected? Are multi-label attributes complete? |
| Bounding Box | Was the object found? Is the class correct? Does the box follow the project’s tightness rule? |
| Polygon | Is the correct object outlined? Does the contour follow the required boundary? |
| Semantic Segmentation | Are pixel classes complete and consistent? Are class boundaries handled correctly? |
| Instance Segmentation | Are individual objects separated correctly in addition to having accurate masks? |
| Keypoint / Landmark | Is the correct point identified? Is placement consistent? Is visibility handled correctly? |
| Polyline | Are endpoints, continuity, intersections, and geometric alignment correct? |
| 3D Cuboid | Are position, dimensions, orientation, coordinate frame, and class correct? |
The acceptance criteria should reflect the model objective and the impact of each error type.
For a broader framework around dataset trustworthiness, see how to evaluate training data for trustworthy AI vision.
Image Annotation Method Selection Checklist
Before committing an image dataset to production, answer these questions:
- What should the model predict?
- Does the model need image-level, object-level, pixel-level, point-level, line-level, or 3D ground truth?
- Does object location matter?
- Does the exact object boundary matter?
- Must individual instances of the same class remain separate?
- Are landmarks or joints more important than complete object geometry?
- Is the target a long or narrow linear feature?
- Does depth or object orientation matter?
- Which classes and attributes are required?
- How should occluded objects be handled?
- What minimum object size or visibility is required?
- Which ambiguous examples should be escalated?
- Can annotators apply the chosen method consistently?
- What quality metric matches the annotation representation?
- Can a simpler annotation method provide enough training signal?
- Has the approach been tested on a representative pilot batch?
If these questions are answered before large-scale labeling begins, teams can avoid producing a technically clean dataset that does not match the model’s actual learning objective.
How Annotera Supports Multi-Method Image Annotation
Annotera provides image annotation services across classification, bounding boxes, polygons, semantic and instance segmentation, landmarks, polylines, 3D cuboids, and other computer vision labeling requirements.
Projects can begin with annotation-schema design and pilot calibration before moving into scaled production. Workflows can include custom taxonomies, project-specific geometric rules, annotator calibration, multi-stage QA, error tracking, dataset versioning, and delivery aligned with the client’s model pipeline.
The annotation method can also evolve as the computer vision program matures. A team may begin with classification to validate a concept, move to bounding boxes for object detection, and introduce segmentation or richer spatial labels when the downstream model requires greater geometric detail.
Conclusion: Use the Simplest Annotation That Captures the Required Ground Truth
The best image annotation method is not the most detailed one. It is the simplest representation that accurately captures what the computer vision model needs to learn.
Use classification when the category matters but location does not. Use bounding boxes when objects need to be localized. Move to polygons or segmentation when boundaries matter. Use landmarks for meaningful points, polylines for linear structures, and 3D cuboids when the model must reason about depth and orientation.
Then define the taxonomy, edge cases, QA rules, and acceptance criteria around that representation before scaling annotation.
Planning a new computer vision dataset or deciding which annotation method fits your model? Talk to Annotera about your image annotation requirements and design the labeling approach around your model objective, data complexity, quality requirements, and scale.